In Pursuit Of My Perfect Coding Environment
Over the years I've been trying to get to my perfect setup when it comes to making the most of the tools I use and maximising every last pixel of screen space for the best distraction free coding experience.
I've recently changed my setup using tmux and Vim, but before we get to that I'll first explain about my previous setup using a nice window management tool on the Mac called SizeUp.
SizeUp
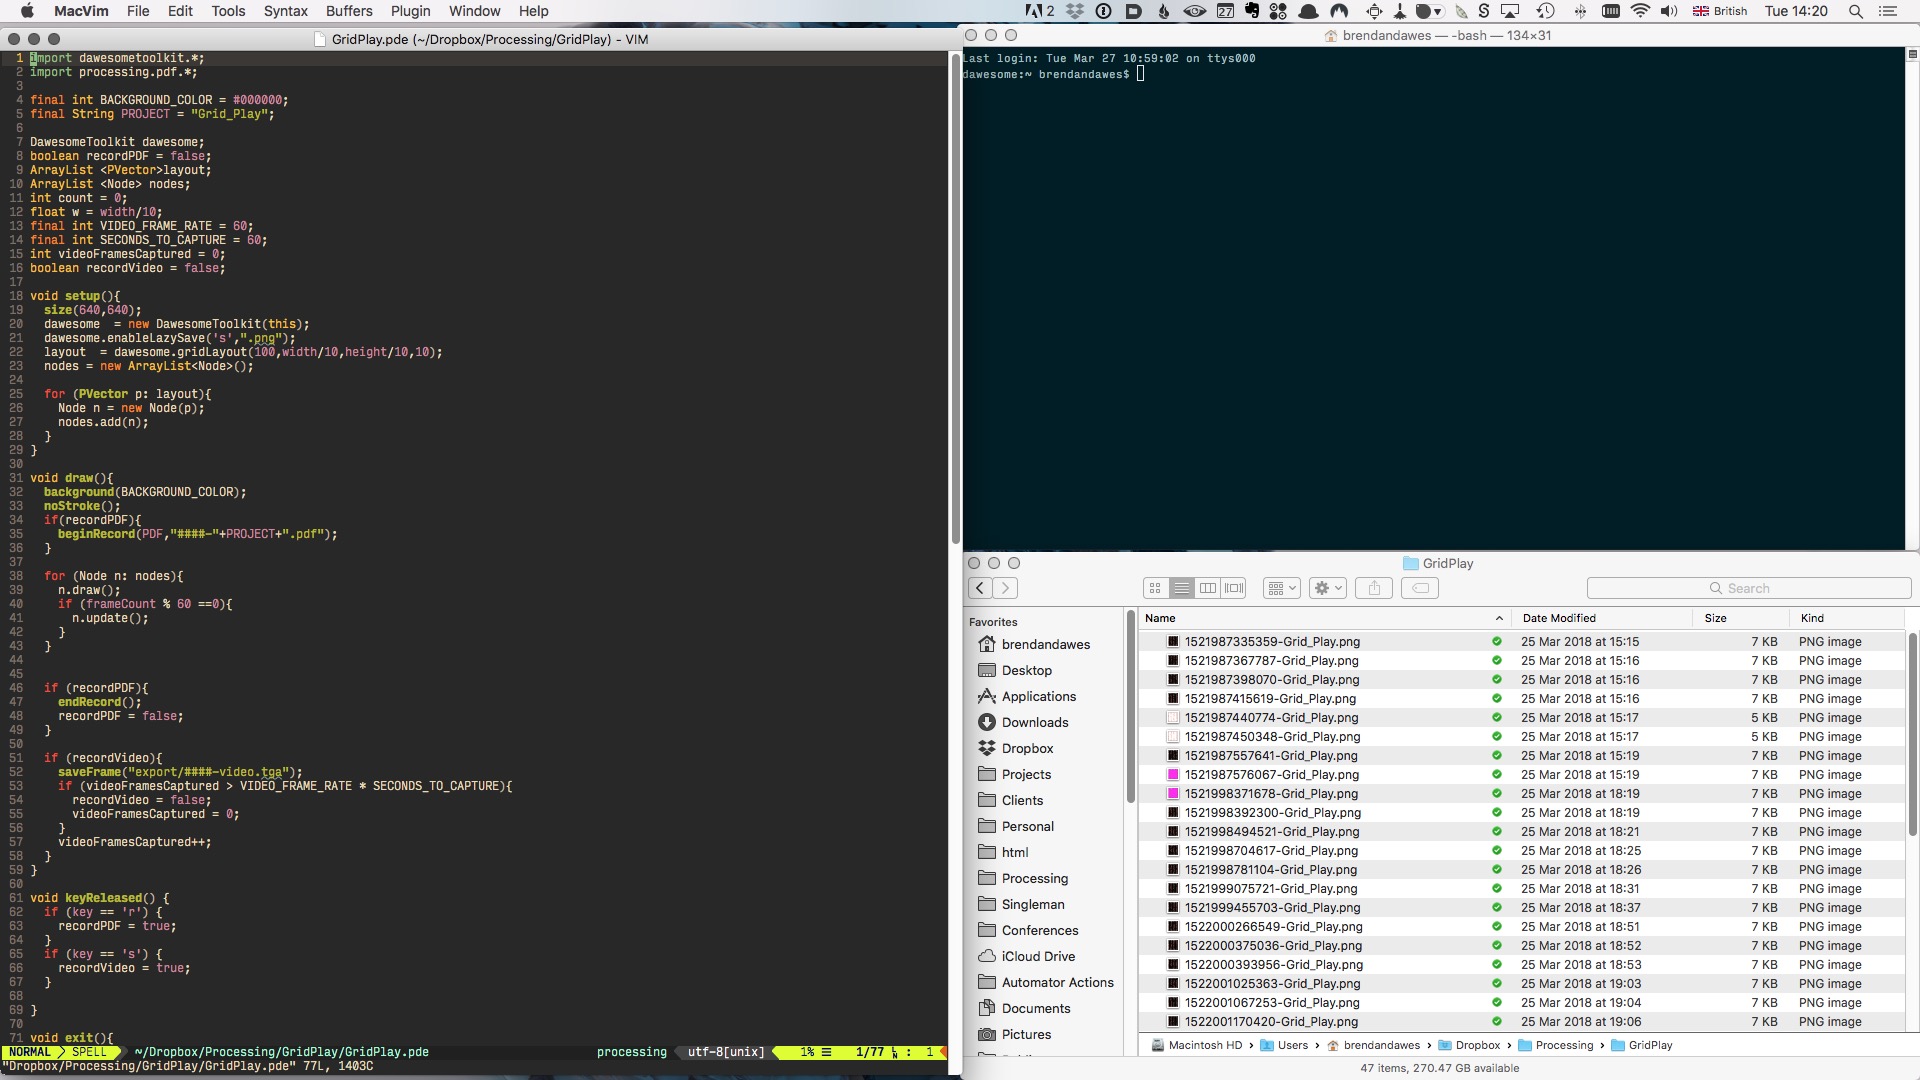
SizeUp is a Mac utility that makes it really easy to manage windows. When I first start on a project I always setup the same window arrangement; my text editor on the left, a terminal window on the top right and a Finder window on the bottom right. With SizeUp you can just press a few shortcut keys and create this arrangement in seconds.
I found this arrangement over the years to work great, but I wondered if I could go further, removing the window title bar and all the window chrome. Of course many text editors can go into full screen mode but the problem is I then don't have visibility of my terminal window which I need for Git et al. Whilst I do make use of the Mac's Spaces feature and I could put the terminal on another desktop, it's still an extra step and feels slightly disjointed as an experience.
tmux
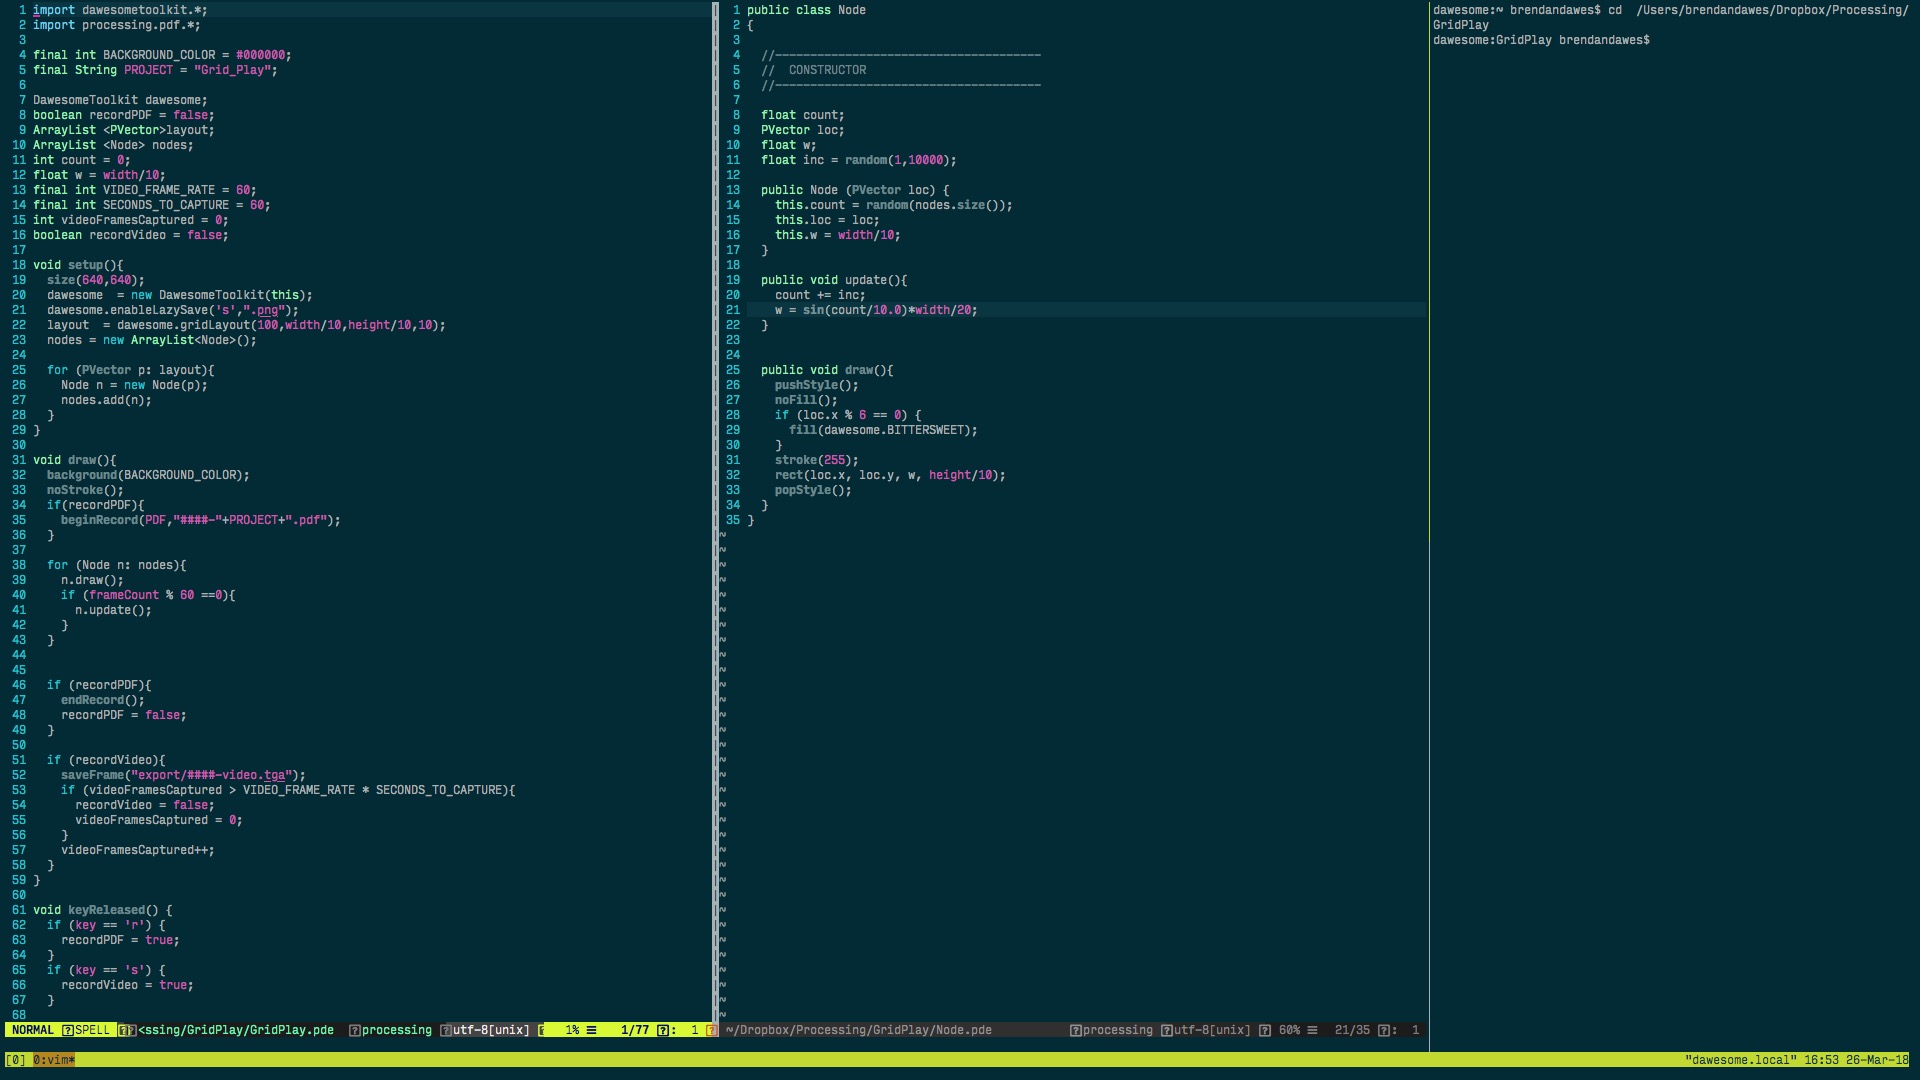
It was then I chanced upon tmux — a terminal multiplexer that allows you to split a terminal up into different windows and panes. After some learning and fiddling about with settings I've now switched to running terminal Vim running through iTerm via tmux and so far I'm liking this setup. I can now have Vim without any title bar distractions, with plenty of room for making splits in Vim and then still have my terminal open and visible on the right hand side. Moving to that terminal view is just done with a keyboard shortcut, but there's also some other cool stuff you can do as you'll see later.
Setting up tmux
Installing tmux is really easy using Homebrew on a Mac. If you don't have Homebrew installed type this in your terminal window:
/usr/bin/ruby -e "$(curl -fsSL https://raw.githubusercontent.com/Homebrew/install/master/install)"Once you have Homebrew installed type this in your terminal to install tmux:
brew install tmuxOnce installed type the following into your terminal:
tmux newIt will look like nothing has changed but notice the green status bar at the bottom. This means you're now inside a tmux session.
We can split that window vertically by pressing:
CTRL-b %You should now have a split window. You can navigate to this other window by pressing CTRL-b and then the relevant arrow key. You can split that window further. Try pressing:
CTRL-b "Now that pane is split horizontally.
Configuring tmux
I have some simple modifications setup which I've put in my home directory in a file called .tmux.conf. When tmux starts up it will load this file and use the configurations. I've mapped the option key and arrow keys to move between windows, plus I've also changed the tmux action key to be CTRL-a rather than CTRL-b as many seem to suggest it's better that way.
unbind C-b
set -g prefix C-a

bind -n M-Left select-pane -L
bind -n M-Right select-pane -R
bind -n M-Up select-pane -U
bind -n M-Down select-pane -D

set-window-option -g window-status-current-bg yellow
bind-key D source-file ~/.tmux.dev
Scripting tmux
Hopefully you can see how this is all starting to work, setting up a tmux session, splitting the windows etc. But doing that every time you want to start work is a bit of a pain so instead we can script tmux and then just use a keyboard combination to quickly setup a tmux session just how we like it, even launching the apps we'd like in each pane.
To do that I created a file in my home directory called .tmux.dev which had the following contents:
selectp -t 0 # select the first (0) pane
splitw -h -p 25 # split it into two halves
selectp -t 0
send-keys "vim" C-m
The first line selects the first pane. The next line splits that pane into two halves, with the second pane set at 25% of the window. We then select the first pane again and then tell it to launch Vim using the send-keys command, followed by C-m which is the equivalent of pressing enter.
To trigger this script in the .tmux.conf file I bind the D key to call this script.
Now, when I start up tmux I can press CTRL-a and then D and tmux will split the windows and lauch Vim in the first pane, ready for me to get to work. You can actually go even further and write a bash script that will launch tmux and do the above but for now this system works for me.
Non-native Full Screen Terminal in iTerm
If you set your terminal app to go full screen you'll now have a nice distraction free coding environment (if you use Vim, Emacs or something similar that is) but I found a slight problem with the Mac native full screen option. I do a lot of my work in Processing, yet when I went to compile a Processing project in full screen mode the desktop would slide over to a free desktop area to launch the newly compiled project. Very annoying. I tried turning off the option in Spaces to always launch an app in its own space, but that didn't help. Also with the native full screen option it turns out that if you have many desktops setup as I usually do, any full screen app is separate to those desktops which makes it really infuriating to navigate to other desktops. Was this the end of my perfect code setup? Well thankfully I found a solution in the form of iTerm's non-native full screen option.
In iTerm's preferences, in General uncheck Native full screen windows. Next go to Profiles > Window and set the style to full screen. Now when iTerm starts up it will fill the entire screen, but importantly, it's still part of your desktop (meaning Spaces navigation doesn't break) and when running Processing builds the build will appear over the iTerm window instead of in another desktop space.
Another advantage of using iTerm is the colour support is a lot better than in the Terminal app. If your're looking for some nice colour themes for the iTerm terminal you can find a great selection here.
iTerm, Vim and Processing
One of my main uses for iTerm is running Vim to code and run Processing applications. Once I have the Processing for Vim extensions installed I needed to define command-B to trigger a Make command that will execute the code I'm working on on. To do that, in the iTerm preferences I went to Profiles > Keys and added a new Send Text command for command-B with this text:
\e:w | Make\nThis has the effect of writing out the buffer you're editing and then triggering the Make command which will build and execute your code.
Vim and tmux
The real power of using tmux with Vim is when you start to employ the send-keys feature, which I used briefly before to launch Vim in the first pane. This allows you to send commands to any tmux pane and have them executed as if you were typing yourself in that terminal window.
A simple example of that is how I've setup a function in Vim that I can call that will change the directory of the terminal window on the right to my current working directory in Vim, ready for any Git commits for this project. This kind of stuff saves you time and all that time saving really adds up during the day. Here's that function which I've added to my .vimrc:
function! SetDir()
    execute "! tmux send-keys -t right 'cd  ".fnameescape(getcwd())."' C-m"
endfunction
I can call this on the Vim command line with :call SetDir() and it will target the right tmux panel and set the directory accordingly.
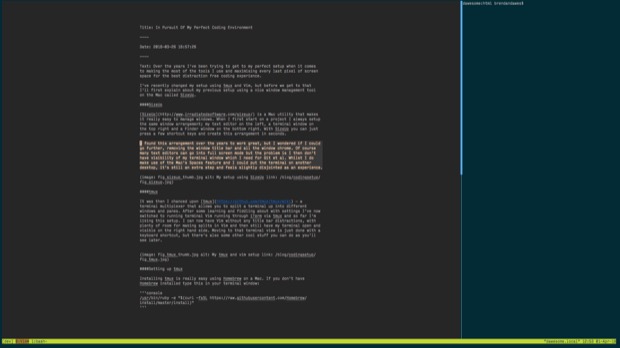
Extreme Distraction Free
If you are a Vim user and you want to take distraction free writing even further then I recommend installing the Goyo plugin together with Limelight, all by the same author. This puts Vim into a really nice distraction free mode, with a perfectly set column width together with dimming out any paragraph you're not currently on. I personally love it.
Going Further
I've really only scratched the surface of tmux usage and there's so much more you can do with it, but I have to say having been using this system for a little while now, I find it not just efficient but pleasurable to use.
To further explore tmux here's a great introduction to setting up and using it.