An introduction to the Dawesome Toolkit — my library for Processing
The Dawesome Toolkit is a library for Processing that I originally made for myself, so I could use bits of code I always use in my projects more easily than copy and paste. I like to think of it as a trusty pen-knife — something you always have to hand and find invaluable everyday.
Since creating it a few years ago I've used it in every Processing piece of work I've made. Sometimes I might use many of its features, other times just one. Regardless, it's been a very handy thing to have around. With that in mind I thought I'd detail some of its features.
Patterns and Laying Things Out
One of the core parts of the library is the ability to create an ArrayList of PVectors formatted a certain way, which you can then use to place objects on the screen. Here's how that's done:
import dawesometoolkit.*;

DawesomeToolkit dawesome;
ArrayList<PVector> layout;
int dotSize = 10;


void setup(){
  size(600,600);
  smooth();
  dawesome = new DawesomeToolkit(this);
  layout = dawesome.circularLayout(100,200);

}

void draw(){

  background(20);
  fill(dawesome.BITTERSWEET);
  noStroke();
  translate(width/2,height/2);
  for (PVector p : layout) {
    ellipse(p.x,p.y,dotSize,dotSize);
  }

}
Which will create a pattern of 100 things around a circle with a radius of 200 pixels like this:

Changing the first parameter of the circularLayout method changes the amount of objects whilst the second changes the radius.
The nice thing is you can easily change this pattern style by using a different layout method. All we need to do is change one line like this:
layout = dawesome.vogelLayout(200,10);Which will then give us this:

As another example of the layout methods lets change this to plot a grid — something I use a lot when working with data and the like.
  grid = dawesome.gridLayout(100,20,20,10);
  // center the grid so 0,0 is the center
  grid = dawesome.centerPVectors(grid);
Which has the effect of changing the layout to look like this:

You'll notice that after the grid method I use another little utility method that will center an ArrayList of PVectors — another handy method that's part of the library.
Here's one more thing from the layout methods, this time distributing objects around a sphere in 3D.
import dawesometoolkit.*;

DawesomeToolkit dawesome;
ArrayList<PVector> vectors;
float boxSize = 10;


void setup(){
  size(600,600,P3D);
  smooth();
  dawesome = new DawesomeToolkit(this);
  vectors = dawesome.fibonacciSphereLayout(100,150);

}


void draw(){

  background(20);
  lights();
  fill(dawesome.BITTERSWEET);
  noStroke();
  translate(width/2,height/2);
  float xRot = radians(270 -  millis()*.02);
  float yRot = radians(270 -  millis()*.03);
  rotateX( xRot );
  rotateY( yRot );

  for (PVector p : vectors) {
    pushMatrix();
      translate(p.x, p.y, p.z);
      PVector polar = dawesome.cartesianToPolar(p);
      rotateY(polar.y);
      rotateZ(polar.z);
      box(boxSize,boxSize,boxSize);
    popMatrix();
  }

}
And you have a nice Fibonacci distribution around a sphere:

Debugging
It's a fact of life that much of the time making coded work is spent debugging things and often times you might print something to the console to find out the status of something so you can investigate further. Well the console is all well and good but sometimes I want something to appear in a HUD type view to show the status of something or a series of things. Because of that I built a couple of things into the Dawesome Toolkit to help me — and hopefully you — out in times of debugging.
The first is a way to display in a HUD style any kind of variable you want. On simply presssing the ! key it will show this small HUD display panel. Here's how you set that up:
import dawesometoolkit.*;

DawesomeToolkit dawesome;
Debug debug;
ArrayList<PVector> sphere;


void setup(){
  size(600,600,OPENGL);
  smooth();
  dawesome = new DawesomeToolkit(this);
  debug = new Debug(this,120,100);
  sphere = dawesome.fibonacciSphereLayout(100,150);
  noStroke();
}


void draw(){

  background(20);
  debug.update("fps",frameRate);
  debug.update("frameCount",frameCount);
  debug.draw();
  lights();

  translate(width/2,height/2);

  float xRot = radians(270 -  millis()*.02);
  float yRot = radians(270 -  millis()*.03);
  rotateX( xRot );
  rotateY( yRot );
  debug.update("xRot",xRot);
  debug.update("yRot",yRot);
  int counter = 0;
  for (PVector p : sphere) {
     pushMatrix();
       translate(p.x,p.y,p.z);
       PVector polar = dawesome.cartesianToPolar(p);
       rotateY(polar.y);
       rotateZ(polar.z);
       pushMatrix();
         fill(dawesome.BITTERSWEET);
         rotateY(radians(90));
         text(counter,0,0);
       popMatrix();
       fill(dawesome.BITTERSWEET);
       box(5,5,5);
     popMatrix();
     counter++;
  }


}
Pressing the ! key will show this debug panel with constantly live updated variables:
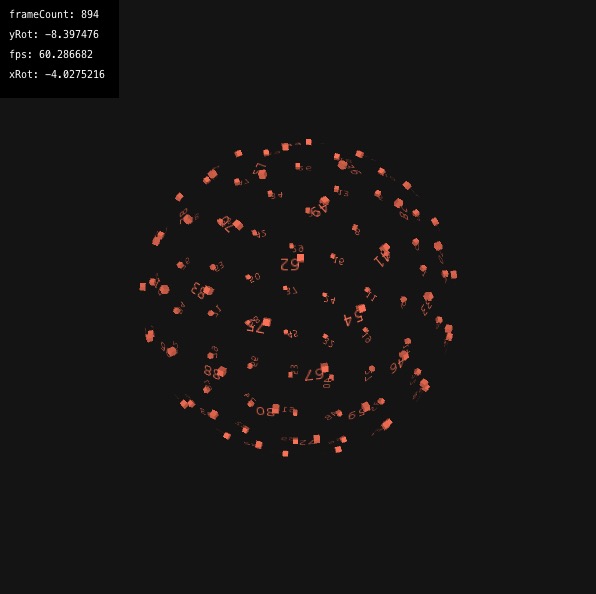
Much easier than watching a scrolling list in the console.
What about if you want to log to a text file instead? Maybe you want to use this as a way to debug or monitor that lovely installation you made when it's installed on site somewhere — something I did recently. Well that's covered too. Just simply writing this for example:
debug.log(frameCount);will append a line of text to a file called log.txt, detailing whatever you want (in this example just the frame rate) complete with a handy time stamp. I'm currently using this on a large piece of client work which enables me to monitor the performance of the system I created remotely.
Documenting The Process
I'm a big fan of constantly documenting the work as I make it, which often involves taking screenshots. It's easy to capture screenshots in Processing but having to type the necessary code for a certain key to capture a screenshot is far too much like time-wasting to me so instead I built it into The Dawesome Toolkit:
 dawesome = new DawesomeToolkit(this);
  // Turn on the saveFrame capture feature
  // Creates a unique time based filename and has a 500ms debounce built-in.
  dawesome.enableLazySave('s',".png");
You can see for obvious reasons I called it enableLazySave. Now whenever I press the defined key — in this example the s key — it will capture a PNG, complete with time stamp — really handy when you come to documenting the work later.
Installing
The Dawesome Toolkit can be installed directly inside the Processing IDE. Go to Sketch > Import Library > Add Library and search for Dawesome and you should see it appear in the options for you to install. Alternatively you can download it directly. Examples are included with the library.
I hope you find it as useful as I do. Now go play...